DIY: Anna Dress
Everyone, I am super excited to finally get my ideas out of my head and onto real bodies! This is the first of many collabs I will be doing with friends and family. I would like to introduce you to Anna!
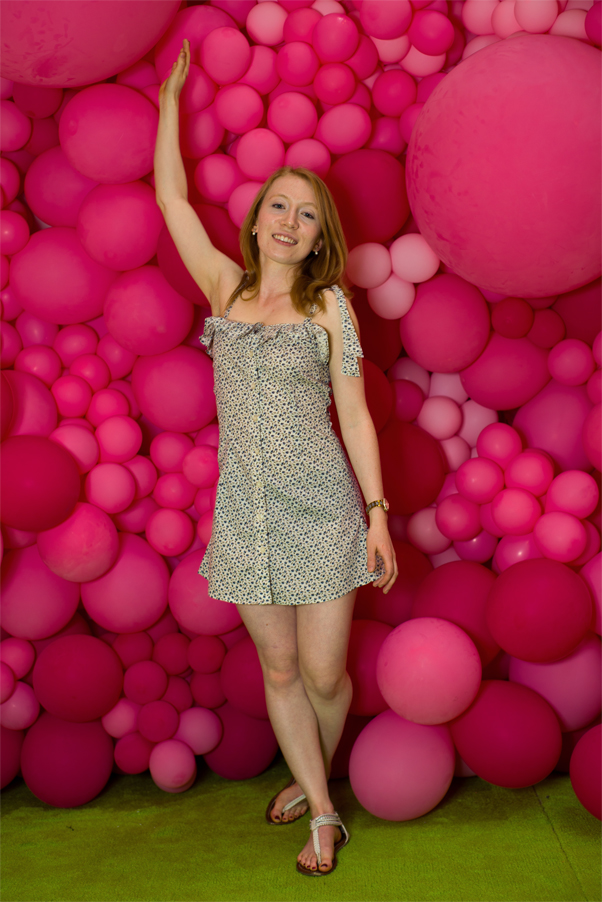
This dress is so adorable and works perfectly for her! She chose the print, and I’m glad it worked out so well!
This ruffle dress was originally a Jacob shirt. Anyone know what I’m talking about when I say Jacob? RIP Jacob. Kidding, they’re still alive in Quebec, but it’s sad to see Canadian brands chased out of the rest of Canada.
I used to work for Jacob when they were alive and thriving in Calgary and Vancouver! But you guys don’t want to hear about my retail days.
Let’s get to it!
I would say this is a level 2 project. You will need to have some basic pattern making skills.
DIY Level 2
What you’ll need:
- A blouse that is 2-3 sizes loose and goes past your hips.
- Off Shoulder Dress Block (Will be manipulated to create the pattern for this dress)
Key features of the finished dress:
- Ruffle at the top of the dress
- Straps hangover shoulders
- Flare at sides
Seam rip the blouse into these parts:
- 2 Front panels
- Back panel
- 2 sleeves
- 4 pieces from the collar
- 2 back yoke pieces
- 2 cuffs
Creating the Pattern and front pieces
- Starting with both the front pieces, unbuttoned, lay them right sides together. Lay the pattern underneath and line up center front to the buttonhole, the bottom of the dress block to the hem of the blouse.
- Trace out the neck and armhole onto the block if they are short on fabric.
- Create new pattern pieces by tracing out the neck and armhole part that was just outlined.
- Make sure to add S/A(seam allowance), grainline (parallel to the button placket), and notches (place notches at the sewing points) on these new pattern pieces. Label them Neck and Armhole, so you don’t mix them up.
- Using one of the top back yokes (one of the 3 parts that detached from the back piece), fold it in half so the shoulder sides meet, pin, and cut out the Neck and Armhole pattern pieces. There should be 2 of each piece, 4 in total. Mark notches.
- Use a stay stitch (straight stitch) on all curves of the pattern, the front shoulder, and neck parts. This will make sure that the curves on all parts will not stretch. If they do stretch, it means that the pattern pieces won’t fit.
- This may be the hardest part of this project. Matchup pattern pieces with one another. Sew carefully when dealing with curves. Don’t forget to match the notches up!
- Iron open the seams.
- To add flare to the sides, decide how much flare would look good on the dress overall. I decided an inch or so. Markdown measurements on scrap paper.
- Create a separate pattern for added flare. Should look like a triangle.
- Use leftover fabric from the yoke that was used to cut out the curves for the front
- Seam rip a little bit of the front side hem to match up the added flare.
- With right sides together, lay the front panels down, with the pattern on top. Make sure the centre front of the pattern lines up with the buttonholes. Trace out darts. Pin and cut.
- Sew the darts.
Back
- You’ll have noticed that the back isn’t looking so great. We took away one of the yokes that used to live on top,the other part of the yoke is too small to complete it, And the back piece is too short to fit the pattern. My work around is to use one of the sleeves. Fold the sleeve lengthwise, starting where the placket is (where the sleeve opens a bit for the cuff), leave some room for S/A and cut off the placket part. Sew the sleeve onto the top of the back.
- Use the remaining yoke from the back as flare for the sides, by folding it in half, making sure the shoulders meet. Cut down the middle. Sew the longer side to the bottom of either side of the back. Make sure to seam rip some of the hem on the back to match up hemming for later.
- Fold the back piece in half, right sides together, lay the pattern out, trace darts (larger one), pin and cut.
- Sew the darts.
Waist Ties
- Use scrap fabric for the back waist ties.
- I sewed several pieces together to create 2 long strips.
- Sew the strips in half lengthwise.
- Use a safety pin to flip the strips outside in.
- Iron down the strips with the seam in the middle.
- Sandwich the strips in between the front and back side seam at the waist.
- Sew the side seams right sides together, make sure to line up the hem, flare seams, and waist seams.
- Waist ties complete!
Shoulder Straps
- Copy the pattern piece for the straps (pictured below),or you can make your own straps by deciding on how long the straps should be. Remember to include extra fabric for after they are tied at the shoulder, and how wide the ‘leaf’ like part will be.
- Cut 4 pieces on the fold.
- Sew all straps on the edge, closing it at the top.
- Flip the straps outside in using a safety pin. Start from the fullest part/leaf and move the fabric over the safety pin that way.
- Iron all the straps flat. Top stitch each strap on the edge of the seam. Set aside
Ruffle
- Use the front and back collar pieces to create the top ruffle.
- Use a straight basting stitch across the top of each piece. Make sure to leave a long tail on all ends.
- Tie off one end of the thread, and grab a single strand of thread from the other side. Pull this while adding ruffle to the collar.
- Tie off the end that was pulled on once the ruffle meets the size of one of the front panels.
- Make sure the other ruffle doesn’t end up under the placket.
Sewing the ruffle and straps together
- Unbutton the dress, good side down.
- Working with the front left panel, and the bad side (inside), pin the bottom of one of the straps (wherever you want them to sit) to the top of the dress.
- On top of that, pin the good side of the ruffle to the bad side of the inner dress.
- Make sure to leave the placket without ruffle. If the ruffle is sewn onto the placket, it will be too bulky for the front. Closing the top of the dress will be harder.
- Do the same on the other side, but the ruffle can extend to the placket. This one will sit on top.
- Sew a straight line across the top of the dress, where the ruffle and straps meet.
- Flip over the ruffle and the straps. The ruffle will sit on the front and the straps will hang over the shoulder.
- Top stitch the ruffle – sew on top and include all the seams underneath, not including the front part.
Finishing Touches
- On the back, fold the top down twice to hide raw edges, sew. This is a rolled hem.
- You may encounter some resistance with the front side seams because we sewed them in the opposite direction. Do your best, or seam rip a little bit of the sides to make sewing the top back more comfortable. Just remember to back stitch at the top of the side seams, that way they won’t come undone.
- Do the same to the hem of the flares. The hem should match up with the hem of the dress. To hem angles like this one, do one side at a time.
Feel free to make variations on this dress! Let me know if you do by tagging me on Instagram with #eccentricdesign
I hope you enjoy this as much as I do!
Love what you’ve got, reimagine what you have – Thanh
CREDITS
Photo – Mac Chehade
Model – Anna Blomgren
